
如何正确安装和更换打印机色带
尕枯非生
2025-01-26 08:00:54
0次
如何正确安装和更换打印机色带
安装或更换打印机色带是一项相对简单的任务,但若操作不当可能会对打印机或色带造成损坏。下面提供一套步骤和注意事项来帮助您正确进行这一操作。
步骤一:准备工作
在开始安装或更换色带之前,首先要准备好所需的所有工具和材料。通常需要的是新的色带、螺丝刀(用于拆卸和安装色带),以及可能需要的打印机手册(以供参考)。
步骤二:关闭打印机并断开电源
在开始任何工作之前,确保打印机已经关闭并断开电源。这是为了防止在操作过程中发生电击或对打印机造成其他损坏。
步骤三:打开打印机的盖板
使用螺丝刀或其他工具打开打印机的盖板,这通常会露出打印头的位置和色带的位置。
步骤四:取出旧色带
小心地取出旧的色带。注意不要用力过猛,以免损坏打印头或其他内部部件。有些色带可能需要通过松开固定螺丝或滑动卡槽来取出。
步骤五:安装新色带
 步骤六:关闭盖板并重新连接电源
将打印机的盖板关闭并确保它已经安全地固定好。然后重新连接打印机的电源并打开它。
步骤七:测试打印
进行一次简单的测试打印,以确保色带已经正确安装并且打印机正常工作。如果打印出来的文本或图像有问题,可能需要重新检查色带的安装情况。
翻译成英文:
How to Correctly Install and Replace Printer Ribbon
Installing or replacing a printer ribbon is a relatively simple task, but improper handling can cause damage to the printer or the ribbon. Below are a set of steps and notes to help you perform this operation correctly.
步骤六:关闭盖板并重新连接电源
将打印机的盖板关闭并确保它已经安全地固定好。然后重新连接打印机的电源并打开它。
步骤七:测试打印
进行一次简单的测试打印,以确保色带已经正确安装并且打印机正常工作。如果打印出来的文本或图像有问题,可能需要重新检查色带的安装情况。
翻译成英文:
How to Correctly Install and Replace Printer Ribbon
Installing or replacing a printer ribbon is a relatively simple task, but improper handling can cause damage to the printer or the ribbon. Below are a set of steps and notes to help you perform this operation correctly.
 Step 1: Preparation
Before starting to install or replace the ribbon, prepare all the tools and materials you need. Typically, this includes a new ribbon, a screwdriver (for disassembling and assembling the ribbon), and possibly the printer manual for reference.
Step 2: Shut down the printer and disconnect the power
Before starting any work, make sure the printer is turned off and the power is disconnected. This is to prevent electrocution or other damage to the printer during the operation.
Step 3: Open the printer cover
Use a screwdriver or other tools to open the printer cover, which will expose the print head position and the ribbon position.
Step 4: Remove the old ribbon
Gently remove the old ribbon. Be careful not to use too much force, as this may damage the print head or other internal components. Some ribbons may need to be removed by loosening fixing screws or sliding slots.
Step 5: Install the new ribbon
Follow the instructions in the printer manual to correctly install the new ribbon. Ensure that the ribbon is on the correct track and fully inserted into the appropriate position. Some models of printers may require you to follow a specific direction or sequence when installing the ribbon. Please make sure to follow the guidelines correctly to avoid errors.
Step 6: Close the cover and reconnect the power supply
Close the printer cover and make sure it is securely fixed. Then reconnect the printer's power supply and turn it on.
Step 7: Test print
Perform a simple test print to ensure that the ribbon has been installed correctly and that the printer is working properly. If the printed text or image has problems, you may need to recheck the installation of the ribbon.
Step 1: Preparation
Before starting to install or replace the ribbon, prepare all the tools and materials you need. Typically, this includes a new ribbon, a screwdriver (for disassembling and assembling the ribbon), and possibly the printer manual for reference.
Step 2: Shut down the printer and disconnect the power
Before starting any work, make sure the printer is turned off and the power is disconnected. This is to prevent electrocution or other damage to the printer during the operation.
Step 3: Open the printer cover
Use a screwdriver or other tools to open the printer cover, which will expose the print head position and the ribbon position.
Step 4: Remove the old ribbon
Gently remove the old ribbon. Be careful not to use too much force, as this may damage the print head or other internal components. Some ribbons may need to be removed by loosening fixing screws or sliding slots.
Step 5: Install the new ribbon
Follow the instructions in the printer manual to correctly install the new ribbon. Ensure that the ribbon is on the correct track and fully inserted into the appropriate position. Some models of printers may require you to follow a specific direction or sequence when installing the ribbon. Please make sure to follow the guidelines correctly to avoid errors.
Step 6: Close the cover and reconnect the power supply
Close the printer cover and make sure it is securely fixed. Then reconnect the printer's power supply and turn it on.
Step 7: Test print
Perform a simple test print to ensure that the ribbon has been installed correctly and that the printer is working properly. If the printed text or image has problems, you may need to recheck the installation of the ribbon.
按照打印机手册中的指引来正确安装新的色带。确保色带在正确的轨道上并完全放入到合适的位置。某些型号的打印机可能需要你在安装色带时遵循特定的方向或顺序。请确保正确遵循指南,以免发生错误。
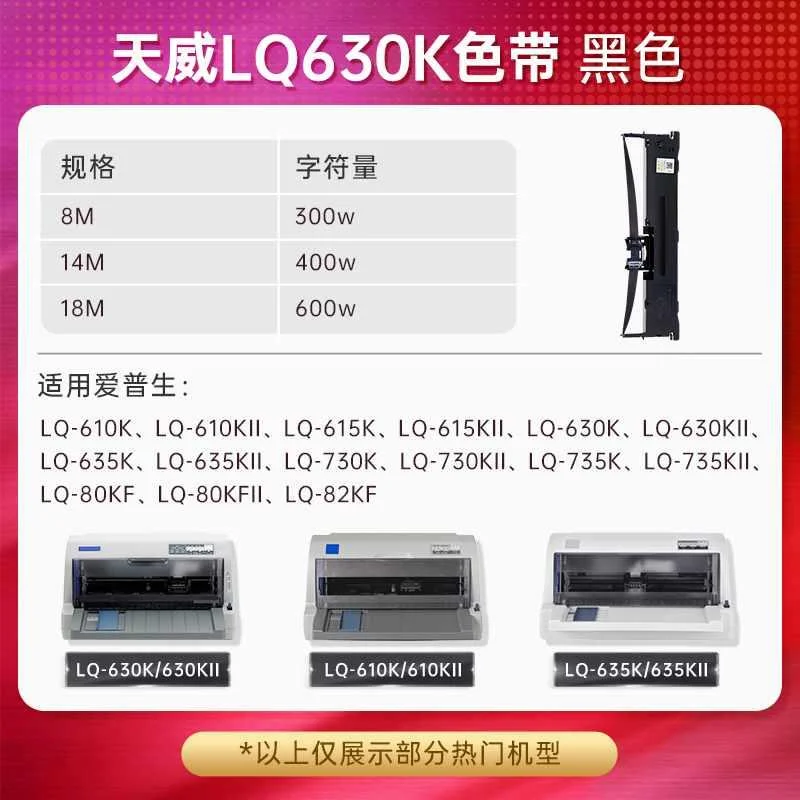
【色带】天威适用爱普生630k色带730kLQ- 635K 610k 735k 730k通用色带框6售价:61.00元 领券价:61元 邮费:0.00
【色带】适用锦宫标签机色带12mm 贴SR2普乐30CH国产标签纸爱普生lw-新品售价:67.00元 领券价:67元 邮费:0.00
上一篇:环保型打印机色带,助力绿色办公
下一篇:办公室必备:高性价比色带推荐
相关内容
热门资讯
色带——你了解它的寿命与更换吗...
本文介绍了色带在打印设备中的重要性及其寿命与更换方法。色带影响打印效果,其寿命受多种因素影响。更换时...
色带损坏怎么办?快速更换与维修...
色带损坏会影响设备正常工作,本文提供色带更换与维修的步骤指南,包括准备工具、拆卸、安装新色带及维修指...
不同品牌色带对比评测,哪款更适...
摘要:
本文对比评测了不同品牌的色带,包括经济实惠型、高性能型、高耐用性型和色彩鲜艳型。选择适合的...
色带大比拼:质量、性能、价格全...
本文全面比较了色带产品的质量、性能和价格。质量关注材料、制造工艺和品牌信誉;性能注重色彩鲜艳度和打印...
色带更换步骤详解,轻松DIY
本文介绍了DIY更换打印机、传真机等设备色带的详细步骤,包括准备工作、打开设备、拆卸旧色带、安装新色...
打印机耗材中的好帮手——不同品...
文章简要分析了不同品牌色带的特点与优缺点,强调选择时应根据需求和预算综合考虑,注意色带品质与打印机兼...
打印机色带的正确使用与维护方法
本文介绍了打印机色带的正确使用与维护方法,包括安装前准备、安装步骤、选择合适的色带、打印设置以及定期...
色带更换指南:让打印机重获新生
本指南详述了如何为打印机更换色带,包括准备工作、更换步骤及注意事项,让打印机重获新生。准备新色带和工...
办公室必备技能:色带的选择与更...
办公室必备技能:色带选择与更换技巧。需根据打印机类型、打印需求和色带质量选色带,注意成本。更换时需关...
兼容色带与原装色带,哪个更合适...
本文探讨了兼容色带与原装色带的优劣。兼容色带价格低廉,适合预算有限用户;原装色带质量稳定,可保证打印...